
How to Install Cabinet Hardware

Installing cabinet door hardware is a budget-friendly project that can improve the functionality and usability of your space. Simply switching out the pulls and knobs can also enhance the overall home aesthetic and increase your home value.
While exploring the styles and finishes available, you may wonder how easy it is to install kitchen cabinet hardware yourself. In this guide, we'll walk you through everything you need to know to help you learn the process of installing cabinet pulls, knobs, and more. Let's dive in.
Choosing the Right Cabinet Hardware

Before installing cabinet handles or knobs, you must determine the best style, design, and finish for your project. The cabinet hardware you decide to pick can completely change the look and feel of your space. It can also impact the functionality of your bathroom or kitchen. What you choose is entirely up to you, but it helps to use the same strategies as home designers when picking door hardware. Here are some quick tips to consider when comparing the different styles:
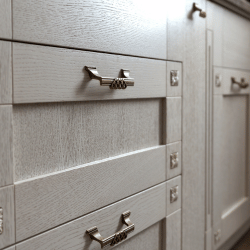
- Door knobs: This option is better for upper cabinets or smaller cabinets. Door knobs complement more traditional and contemporary aesthetics. However, door knobs with a matte black finish can be styled to complement modern homes.
- Cabinet pulls: Pulls are ideal for bottom cabinets and heavier drawers. This hardware comes in both modern and traditional shapes.
Where to Install Cabinet Hardware?
When installing cabinet hardware, placement is key to both functionality and aesthetics.
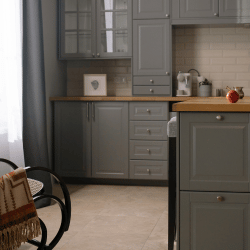
For upper cabinets, knobs or pulls are typically positioned 2 to 3 inches from the bottom corner of the door, ensuring they are easy to reach and operate. If using pulls, they can be installed vertically for a more traditional look or horizontally for a modern touch.
For lower cabinets, hardware should be placed 2 to 3 inches from the upper corner, mirroring the upper cabinet placement. On drawers, knobs are usually centered, while pulls can be placed in the center or toward the top edge for ease of use, especially on larger drawers.
Tools & Materials Needed for Cabinet Hardware Installation
Next, you'll need to ensure you have the right tools and materials for the installation. To install your cabinet hardware, all you'll need is:
- Drill with drill bits
- Tape measure
- Screwdriver
- Screws
- Cabinet hardware of your choice
- Cabinet Door & Drawer Hardware Installation Template Kit*
You may also want a level on hand to ensure your cabinet hardware is accurately lined up to maintain a consistent appearance.
*this item is not necessary but recommended
Step by Step Guide for Cabinet Handle Installation
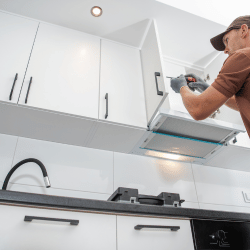
Once you’re ready to start the cabinet handle installation process, here’s how to get started:
1. Preparing Your Doors
How much prep you need to do depends on what kind of doors you order. Paint-grade doors come fully-sanded and ready for you to paint. You will want to paint before you install handles on cabinet doors, so make sure this step is complete before moving on. You can also order finished doors that come with one of five stylish paint colors already applied. No matter what kind of doors you order, hang all of them on your cabinets before starting to address the hardware.
2. Collecting The Right Equipment
Installing cabinet door hardware is a fairly easy and inexpensive job as long as you have the right equipment. You will need a pencil, an electric drill with a drill bit, and all the hardware you plan to use. You can complete the job with just this equipment, but it’s a lot easier if you also have a miracle tool known as a jig.
3. Introducing The Jig
A jig is a plastic template that can ensure you will drill the holes for your handles and knobs in exactly the right place. Without a jig, you would have to carefully measure each door or drawer to determine exactly where to drill. It’s not rocket science, but it’s also very easy to measure an inch off, drill in the wrong place, and end up with unattractive or inconsistent doors. A jig makes this problem almost impossible. There are separate jigs for doors and drawers, but both work in the same way: you position the jig in the center of the drawer or the bottom corner of the door.
There are holes placed throughout the jig indicating where you should drill for various handle sizes and drawer/door dimensions. When you use the holes to make your drill marks, you know they’re lined up perfectly and consistently across all your doors. As we noted earlier, a jig is not absolutely necessary, but having one makes it faster and easier to install your hardware without making an expensive mistake.
4. Installing The Hardware
Once your drill holes are marked, carefully drill through the doors and drawers. Now all you need to do is screw in the handles or knobs according to the instructions provided by the manufacturer. Make sure they’re screwed in tight, and consider using a thread adhesive to prevent wobbly hardware.
5. Final Steps
Once the doors are hung and the hardware is installed, take some time to inspect everything. Look for any parts of the finish that may have been damaged during installation. Make sure that all the doors hang straight and align correctly. If they don’t, adjust the hinges until you get clean, consistent lines. Use wood putty to fill in any holes drilled by mistake (this is unlikely to happen when you use a jig) and keep some of your finish product (paint or stain) around so you can touch up spots if they ever become damaged.
How Much Does It Cost to Install Cabinet Hardware?
Most homeowners can easily install kitchen cabinet hardware on their own. While the process can be tedious, with clear instructions, you can complete the project in one day.
Before you start the cabinet door hardware installation, you'll want to factor in the costs of the hardware and tools needed. The number of cabinets you have will also impact the total project cost.
Common Mistakes to Avoid When Installing Hardware on Cabinets
If you're installing cabinet door hardware on your own, you'll want to avoid the following common mistakes:
- Misalignment: A misalignment or an uneven cabinet door hardware installation can provide inconsistent results. The best way to avoid this is to use a tape measure and a level to achieve an accurate install.
- Drilling errors: If you drill in the wrong place or tighten the screws too much, it can crack or split the wood. If this happens, you may need to use wood filler or a wood plug to fill in the holes before you try again.
- Choosing the wrong hardware size: If your hardware is too big or too small for your cabinets, it can look disproportionate or uneven. The best way to avoid this is to measure your cabinets or order hardware samples before investing.
- Choosing the wrong hardware style: Choosing a style too traditional for a modern kitchen can impact your home design. Consider exploring Pinterest for inspiration or ordering a sample before investing to ensure the hardware will complement the space.
Why Won’t My Cabinet Doors Stay Closed?
Cabinet doors that won’t stay closed are often caused by worn-out or misaligned hinges, especially if they’ve loosened over time. It could also be due to warped doors, poor alignment, or missing magnetic or mechanical catches. Replacing or adjusting the hinges usually solves the problem.How Do I Stop Cabinet Doors From Slamming?
To stop cabinet doors from slamming, you can install soft-close hinges or add small cushioning bumpers where the door meets the frame. These options help slow the door’s movement and reduce noise. Soft-close hinges are especially effective for a smoother, quieter close.Final Tips for a Professional-Looking Installation
Once you're ready to start your installation, here are some quick tips to get a professional-looking finish.
- Use a template: Using a template can help improve consistency and accuracy. It can also help speed up the installation process and ensure a professional finish.
- Check placement before drilling: Always double-check and measure the placement of your hardware before you start drilling. This will help you maintain uniform spacing, helping you achieve more consistent results.
- Clean regularly: Cabinet door hardware should be cleaned to maintain its look and feel. You should clean the hardware regularly with a gentle soap and washcloth.
Can I Get Cabinet Doors Without Pre-Drilled Holes?
You can order cabinet doors without pre-drilled holes. This option is ideal if you want full control over hinge placement or are using specialty hardware. Ensure you’re comfortable drilling the holes yourself or working with a professional installer.Can I Drill Hardware Holes Myself?
It’s possible to drill hardware holes yourself if you prefer to handle the installation. Accuracy is important, so using a template or guide is recommended to help with consistent placement. If you’re unsure, you may want to consult a professional to avoid damaging the doors.Order Cabinet Hardware at Cabinet Door Factory
Don't miss out on our premium range of cabinet hardware! Enhance the look and functionality of your cabinets with our top-quality selections. Whether revamping your space or updating your hardware, we've got you covered.
Click here to explore our hardware collection now!
